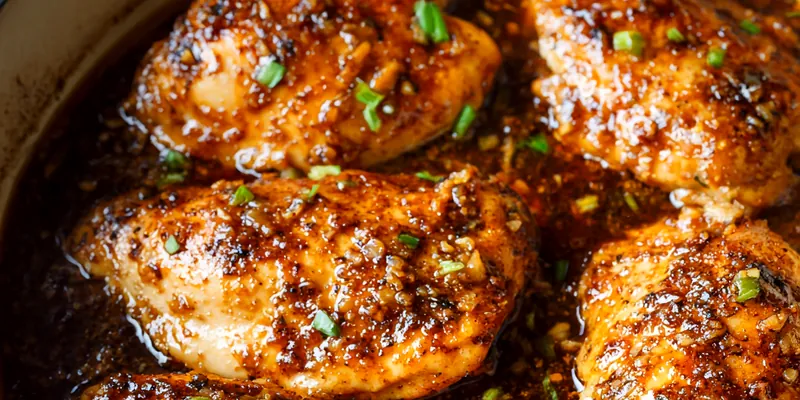
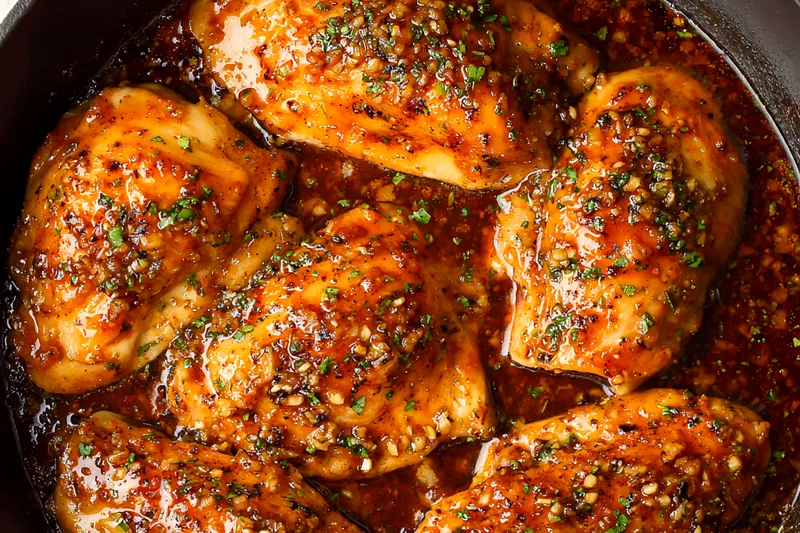
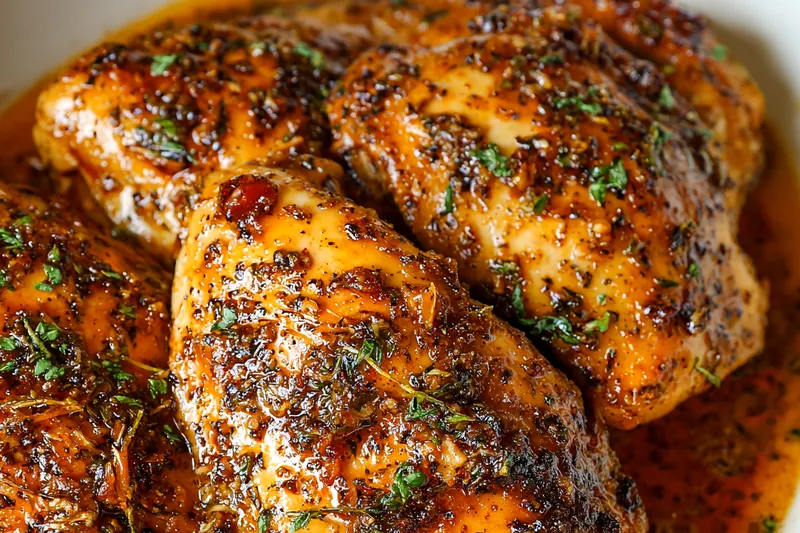
Crispy Sugar Garlic Chicken
Crispy fried chicken pieces coated in a sweet and savory garlic glaze. This Korean-inspired dish delivers the perfect balance of crunchy texture and addictive flavor.

The Perfect Crispy Coating
The secret to exceptional sugar garlic chicken lies in achieving the perfect crispy coating that stays crunchy even after glazing. The combination of flour and cornstarch creates a light, crispy exterior, while the buttermilk marinade tenderizes the meat and helps the coating adhere properly.
Double-coating or using the right oil temperature is crucial for that signature Korean fried chicken crunch. The coating should be golden brown and audibly crispy when you bite into it, providing the perfect textural contrast to the sticky-sweet glaze.
💡 Professional Tip
Maintain oil temperature at 350°F throughout frying. If the temperature drops too much when adding chicken, the coating will absorb oil and become soggy instead of crispy.
Frequently Asked Questions
Absolutely! Cut boneless thighs into bite-sized pieces or use bone-in thighs cut into smaller portions. Adjust cooking time to 12-15 minutes for larger pieces.
Toss the chicken in the glaze just before serving and serve immediately. The cornstarch in the coating helps maintain some crispiness even when sauced.
Yes, bake at 425°F for 25-30 minutes, turning once. Spray with oil for extra crispiness. The texture won't be exactly the same as fried, but still delicious.
Mix 240ml regular milk with 1 tablespoon lemon juice or vinegar. Let sit for 5 minutes before using. Plain yogurt thinned with milk also works.
The base recipe is mild and sweet. The red pepper flakes are optional for heat. Add gochujang (Korean chili paste) to the glaze for authentic Korean spice.
Yes, the glaze can be made up to 3 days ahead and refrigerated. Reheat gently before tossing with the hot fried chicken.
Use neutral oils with high smoke points like vegetable, canola, or peanut oil. Avoid olive oil as it has a lower smoke point and strong flavor.
Store in the refrigerator for up to 3 days. Reheat in a 375°F oven for 8-10 minutes to restore some crispiness. Microwave will make it soggy.
Recipe Troubleshooting Guide
Soggy Coating
Problem: Chicken coating is not crispy
Solution: Ensure oil is at proper temperature (350°F), don't overcrowd the pot, and drain well on paper towels. Pat chicken dry before coating.
Glaze Too Thin
Problem: Garlic glaze won't thicken properly
Solution: Make sure the cornstarch slurry is well mixed before adding. Simmer longer to reduce, or add more cornstarch slurry gradually.
Burnt Garlic
Problem: Garlic in the glaze tastes bitter
Prevention: Keep heat at medium and don't let the sauce boil vigorously. Add garlic later in the cooking process if it browns too quickly.
Uneven Cooking
Problem: Some pieces are overcooked while others are underdone
Recovery: Cut chicken into uniform sizes, don't overcrowd the fryer, and use a thermometer to check doneness. Fry similar-sized pieces together.
Coating Falls Off
Problem: Flour coating doesn't stick to chicken
Prevention: Ensure chicken is properly marinated in buttermilk, pat slightly dry but leave some moisture, and press coating firmly onto chicken.
Flavor Balance Issues
Too Sweet: Add more soy sauce or rice vinegar to balance sweetness
Too Salty: Add more brown sugar or honey to balance saltiness
Bland: Increase garlic, add fresh ginger, or finish with sesame oil
Building Layers of Flavor
The magic of sugar garlic chicken lies in the harmony between the crispy, seasoned coating and the glossy, flavorful glaze. Fresh garlic and ginger provide aromatic depth, while brown sugar and soy sauce create the perfect sweet-savory balance that defines this Korean-inspired dish.
Quality ingredients make a significant difference in the final result. Fresh garlic that's minced just before cooking, real sesame oil for authentic nutty flavor, and good-quality soy sauce all contribute to the complex, restaurant-style taste that makes this dish so addictive.
Essential Ingredient Notes
- Chicken Selection: Wings and drumettes work best for their size and skin-to-meat ratio. If using larger pieces, cut into uniform sizes for even cooking.
- Cornstarch Magic: The cornstarch in both the coating and glaze is crucial - it creates extra crispiness and helps the sauce cling to the chicken beautifully.
- Fresh Aromatics: Use fresh garlic and ginger for the best flavor. Bottled versions lack the pungency and aroma that make this glaze truly special.
Mastering the Frying Technique
Achieving the perfect crispy coating requires attention to temperature and timing. The oil must be hot enough to create immediate sizzling when the chicken hits it, but not so hot that the outside burns before the inside cooks through. Consistent temperature is key to evenly golden, crispy results.
The glazing process is just as important as the frying. The glaze should be warm and glossy when you toss the hot chicken in it, creating that signature sticky coating that clings to every crispy surface. Work quickly to maintain the chicken's heat and crispiness.
The Perfect Glaze
Simmer the glaze until it coats the back of a spoon, then immediately toss with hot fried chicken. The residual heat helps the glaze set properly while maintaining the coating's crunch.
Crispy Sugar Garlic Chicken
📋 Ingredients
For the Chicken
- 100g brown sugarCreates the sweet base
- 60ml soy sauceAdds savory umami depth
- 60ml rice vinegarProvides tangy balance
- 6 cloves garlic, mincedThe star flavor component
- 2.5cm fresh ginger, gratedAdds warmth and complexity
- 1 tbsp sesame oilAuthentic nutty flavor
- 2 tsp cornstarch + 2 tbsp waterThickens the glaze perfectly
For the Garlic Glaze
- 900g chicken wings or drumettesPerfect size for finger food
- 240ml buttermilkTenderizes and helps coating stick
- 120g all-purpose flourForms the base of crispy coating
- 60g cornstarchCreates extra crispiness
- 1 tsp saltSeasons the coating
- 1/2 tsp black pepperAdds subtle heat
- Vegetable oil for fryingHigh smoke point oil preferred
Instructions
Marinate Chicken
Place chicken pieces in buttermilk and marinate for at least 30 minutes or up to 4 hours in the refrigerator. This tenderizes the meat and helps the coating stick.
Prepare Coating
In a large bowl, whisk together flour, cornstarch, salt, pepper, garlic powder, and onion powder. Remove chicken from buttermilk and dredge each piece thoroughly in the flour mixture.
Fry the Chicken
Heat oil to 350°F (175°C) in a large pot or deep fryer. Fry chicken pieces in batches for 8-10 minutes until golden brown and cooked through (165°F internal temperature). Drain on paper towels.
Make Garlic Glaze
In a large saucepan, combine brown sugar, soy sauce, rice vinegar, minced garlic, grated ginger, and sesame oil. Bring to a simmer over medium heat, stirring until sugar dissolves.
Thicken Sauce
Add the cornstarch slurry to the simmering sauce and cook for 1-2 minutes until thickened and glossy. Add red pepper flakes if using. Remove from heat.
Glaze and Serve
Toss the hot fried chicken in the warm garlic glaze until evenly coated. Garnish with sesame seeds and chopped green onions. Serve immediately while crispy.
Recipe Notes & Tips
Storage
Best served immediately for maximum crispiness. Store leftovers in the refrigerator for up to 3 days and reheat in a 375°F oven to restore some crunch.
Serving Suggestions
Serve with steamed rice and pickled vegetables for a complete Korean-style meal. Great as an appetizer or main dish with Asian coleslaw on the side.
Variations
Try adding gochujang for authentic Korean heat, honey for extra sweetness, or substitute maple syrup for brown sugar. Cauliflower florets work well for a vegetarian version.